CSV Source
A domain can be created by making a CSV file as part of a data source, which in turn can be added as a table. To make a CSV available for a user to use the data and build a report, follow the below steps:

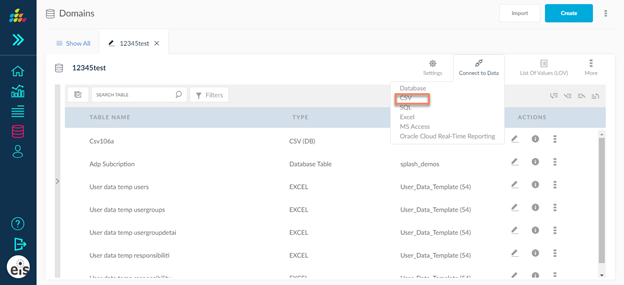
- Click connect to data
 icon and choose CSV in the source list box .
 - When the CSV is selected, a pop up is displayed with the Details, Columns and Data tabs.

Details Tab
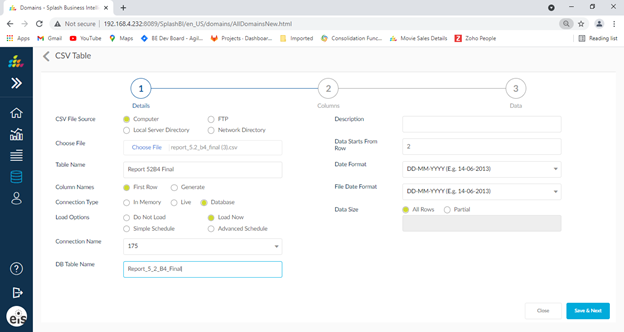
Enter the details in the details tab as shown below:
- CSV File Source: User can access file source by 4 ways
By selecting computer radio button enter a path where the CSV file exists.
By selecting FTP radio button user can select the CSV file present in any FTP by providing correct details.
By selecting local server directory radio button user can select a path where the CSV file exists.
By selecting Network Directory radio button user can select the CSV file present in network directory by providing correct details.
- Table Name: The table name is populated by default with the CSV file name which can be changed later if needed. The user can also specify a name for the table.
- Data Starts From Row #: This accepts a number where the user can specify the row number in the CSV from which data starts.
- Column Names: Select the First Row radio button if the column names for the data columns are present in the CSV. If there are no column names in the CSV, select the Generate radio button to generate the column names by default.
- Description: Enter a description for the table name.
- Connection Type: The connection type can be Live or In memory or Database.
When the connection type is selected as In memory, options like Load Now and Schedule and advance schedule will be displayed and table will be created in H2 database and data will be fetch from same .
When the connection type is selected as database, options like Load Now and Schedule and advance schedule and do not load will be
displayed and table will save in selected connection from connection drop down and DB Table Name is populated by default with the file name.
- Load Now: When Load Now is selected, the reload option is displayed. The reload button is used to again load the data again in the domain for a second time or in an update mode.
- Schedule: When the Schedule option is selected, options like Start Time, Frequency and Interval are displayed to configure the loading start time. If frequency is selected as Once, the interval need not be displayed.
- Advance Schedule: When the advance Schedule option is selected, options like Start Time,End Time, Months, On,Dates and Days are displayed to configure the loading start time.
- User can perform both schedule and advance schedule.
- Data Size: Select All Rows to load the entire data from the CSV. If the Partial option is selected, then provide the number of rows to be downloaded in the text box provided.
Columns Tab
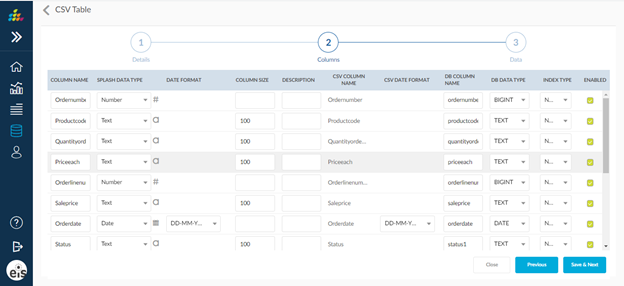
All the columns selected in the query are displayed under the columns tab.

For details on columns and its properties, click here.
Data Tab
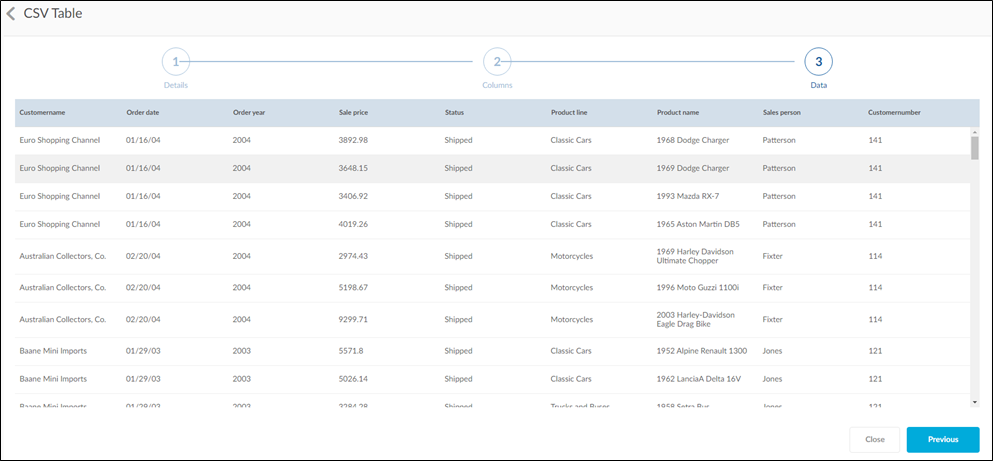
The data tab shows the data of that particular loaded CSV.

Now CSV is supporting PostgreSQL and SQL server connectors.