User Settings
Administrators can edit any user setting which can be restricted or granted based on company policy or IT discretion. Settings are similar to system access in most applications.
- Default Local Settings
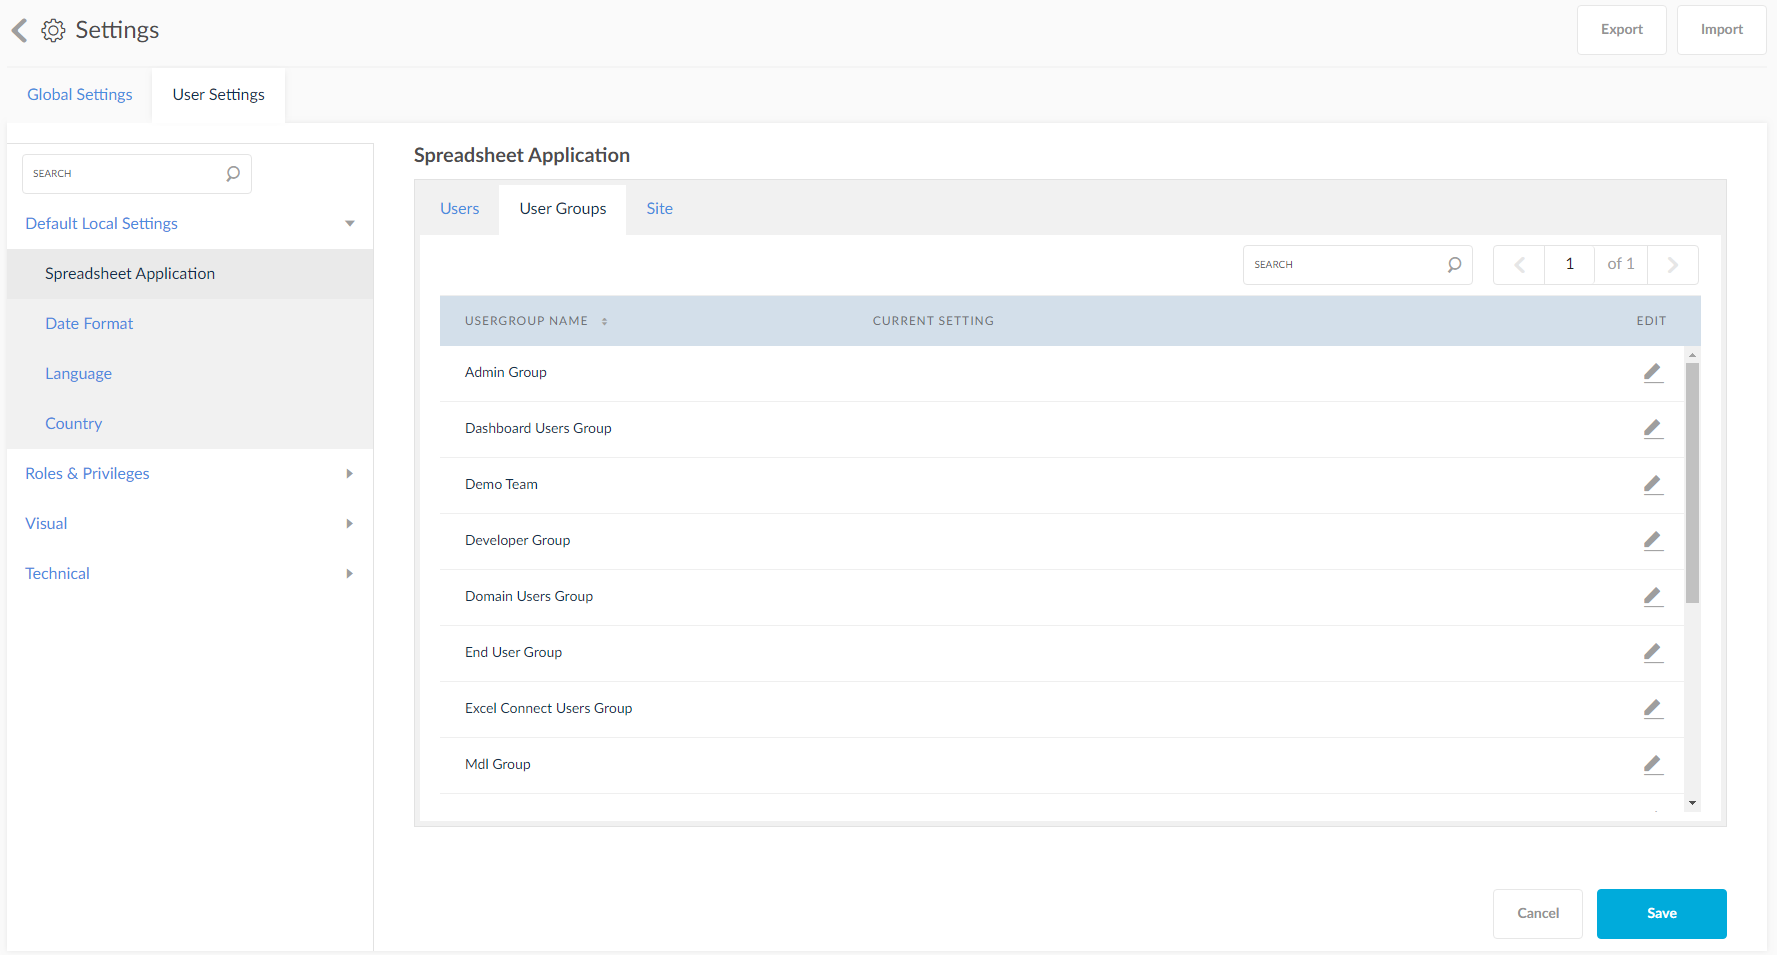
- Click on the User Settings tab to display the list of all available settings which are displayed on left side of the screen.
- Click on the User Settings tab to display it at the right side of the screen, the administrator can change the settings for particular users from this section.
- Click on the edit icon of any setting and a list of all available users is displayed under User Settings tab.
- You are displayed with a current setting value and edit option.
- To change the value setting for any user, click icon of that user and provide the new value. Click Save button to apply the changes. Click Cancel button to cancel changes.
Roles and Privileges
The administrator can setup the roles and privileges needed for the users under these sections. Click the Edit ![]() icon to modify the roles and privileges.
icon to modify the roles and privileges.
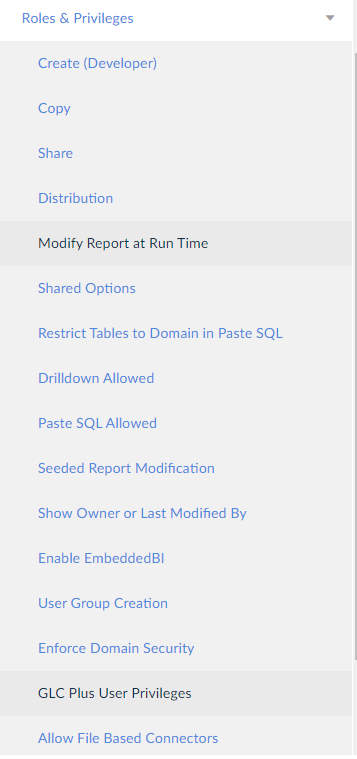
- Create (Developer): Select what modules among Charts, Dashboards, Domains, Reports, and Report Sets does the user has create access.
- Copy: Choose what the user can copy among Charts, Dashboards, Reports, and Report Sets.
- Share: Select the options among Domains, Dashboards, Reports, Report Set, Report Process, Report Set Process and Chart on which the user/user group has access to share.
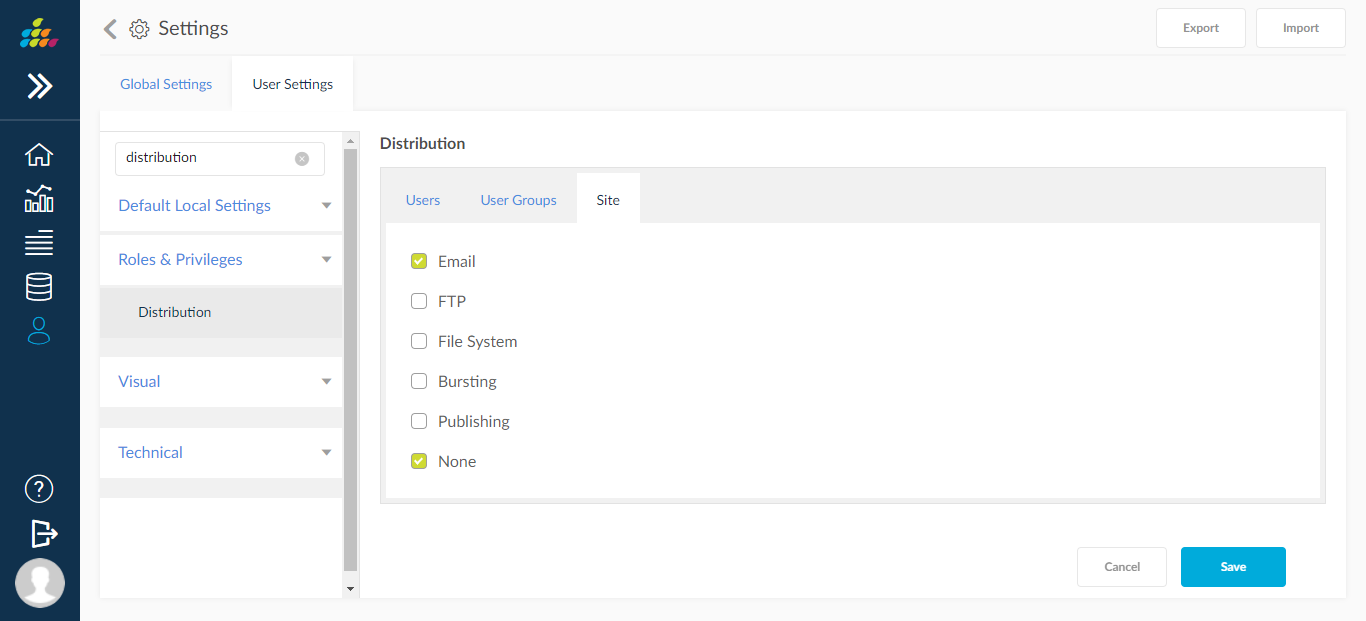
- Distribution: Select the options among Email, FTP and File System the user has access to distribute through these channels.
Given another option as NONE so that no Distribution option is shown to the user
- Modify Report at Run Time: Set to ON/OFF to let the user modify report while it is run process.
- Share Options: Select among Users, User Groups and Responsibilities that the user can view and share.
- Restrict Tables to Domain in Paste SQL: Turn this setting ON to restrict the user to the usage of tables only available in the respective domain when using paste SQL.
- Drilldown Allowed: Turn this setting ON to allow users to drilldown in the reports. When OFF the drilldown icon within reports is hidden.
- Paste SQL Allowed: Turn this setting to ON enable the Paste SQL feature of Report creation for the specified user.
- Seeded Report Modification: Turn this setting ON to allow the specified user to modify seeded objects. The recommendation is to not allow users to change seeded objects, protecting the systems capability to perform and implement clean upgrades.
- Show Owner or Last Modified By: Select between Owner/Last Modified By name that has to be displayed beside the name of the dashboard/report/domain.
- Enable Embedded BI: Set to ON/OFF.
- User Group Creation: The admin can provide the user with the rights to create/edit a user group. The user will not be able to create user groups when the setting is set to Off.
- Enforce Domain Security: Control the visibility of a report to the end user. Enabling this setting to ON will make a report visible to user whose has access to the domain in which the report
is created.
- GLC Plus User Privileges: There are multiple options where the admin can give users the access to. Options like GLC + Admin, GLC + Power User, GLC+ Read-Only.
- Allow File Based Connectors: You can choose between options like CSV, Excel, and MS Access.
Visual
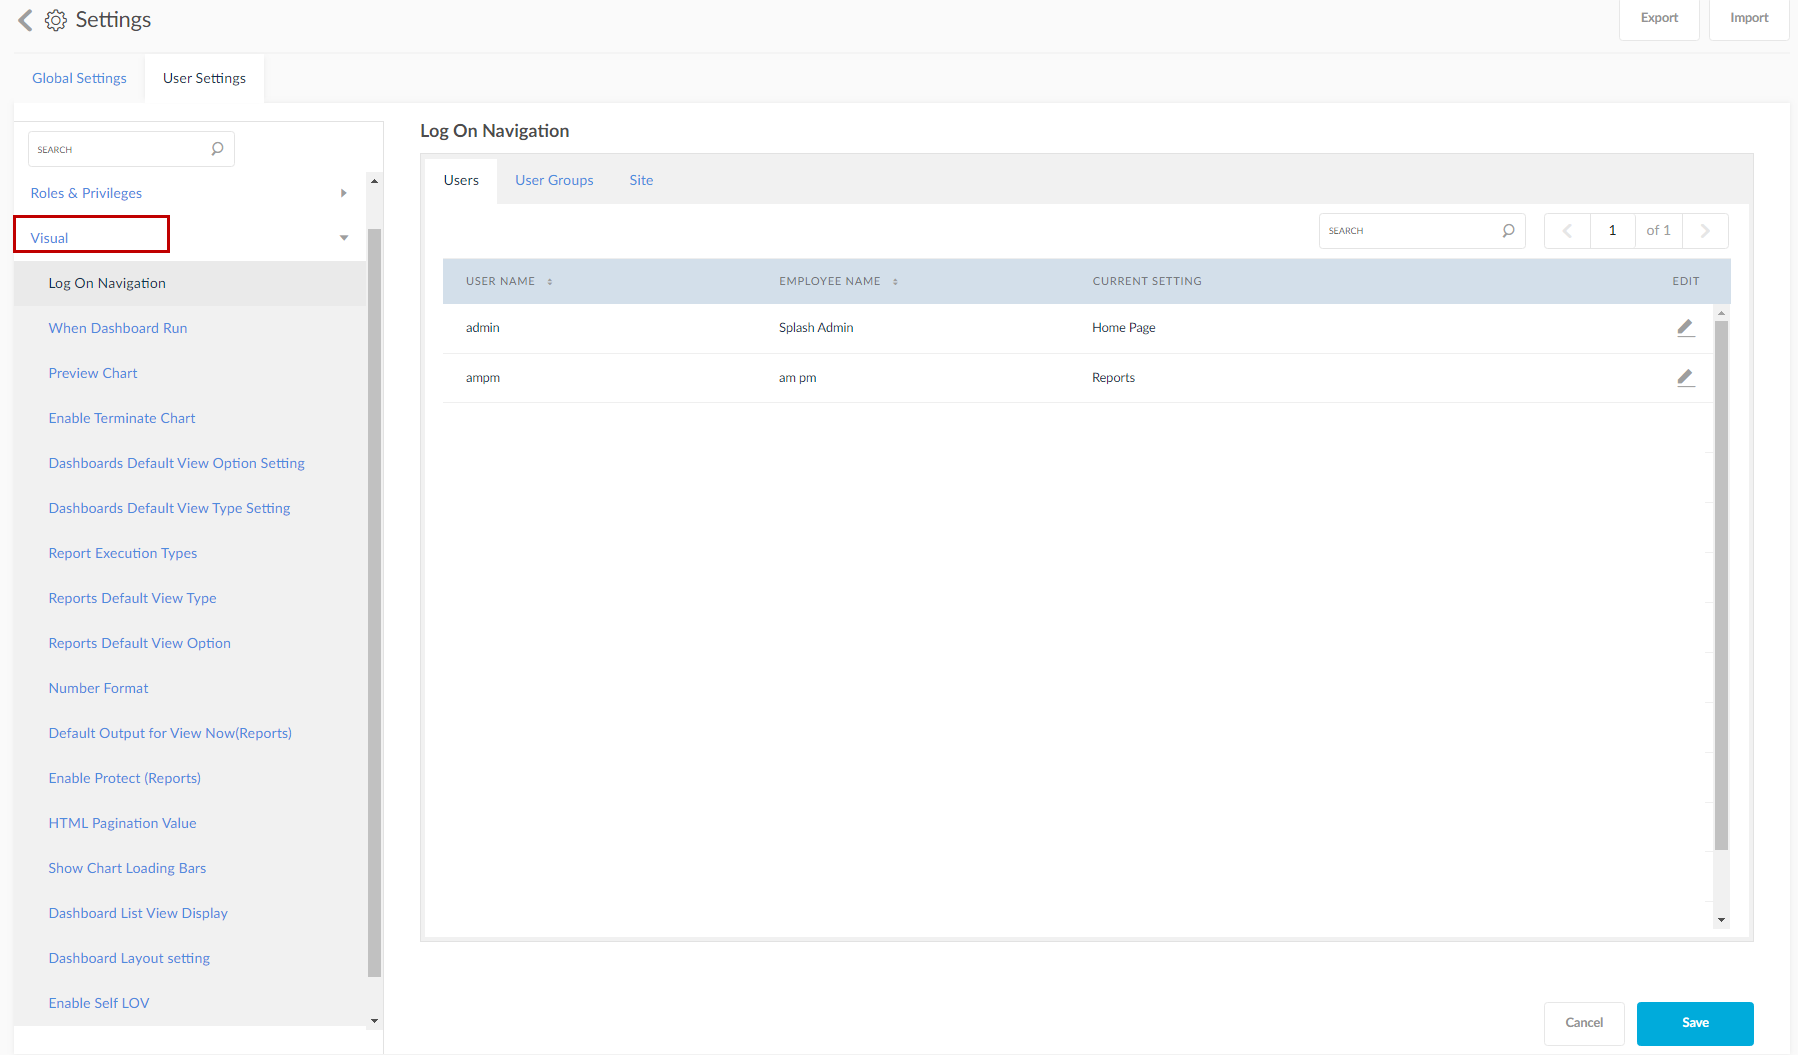
The visual section consists of:
- Log On Navigation: Choose the page that opens once you log in.

- When Dashboard Run: Decide how the dashboard is displayed. In the same window or in a different window.

- Preview Chart: You can choose between On/Off to preview the chart before actual submission.

- Enable Terminate Chart: You can select the options between Yes/No as to whether the user can terminate the chart during processing or not.

- Dashboards Default View Option Setting: Select for the user what will they view when they click on the Dashboards icon.
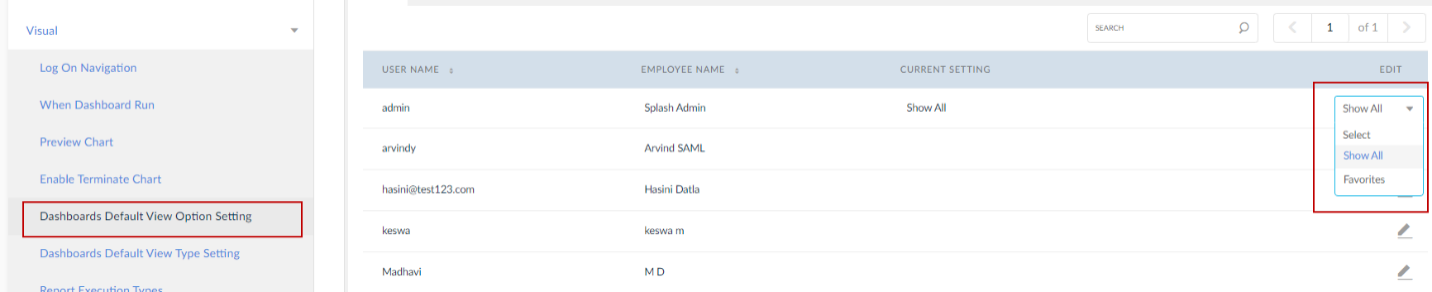
- Dashboards Default View Type Setting: Select for the user between List View and Grid View default settings.

- Report Execution Types: Choose between View Now and Submit or choose Both for the user to access when they run the report.

- Reports Default View Type: Choose what view the user can see when they click on the Reports module.

- Reports Default View Option: Choose what the user can see when they click on the Reports module.

- Number Format: Choose the number format the user can view.

- Default Output for View Now (Reports): Select the type of report output the user gets to see when they click on View Now in the Report submission page.

- Enable Protect (Reports): Control the visibility of the protect icon for the reports.

- HTML Pagination Value: Set the HTML pagination value.

- Show Chart Loading Bars: Set this to ON/Off. Set this to off for faster loading charts.

- Dashboard List View Display: Decide the default view for the dashboards module in the list view.

- Dashboard Layout Setting: Assign users with dashboard design filtered by group.

- Enable Self LOV: Select this to Yes/No and the result is displayed in the domain settings. If the Default is selected at the domain level, then whatever is selected in the admin is reflected.

Technical
Here, there are multiple technical functions which the user can decide using ON/OFF or Yes/No.
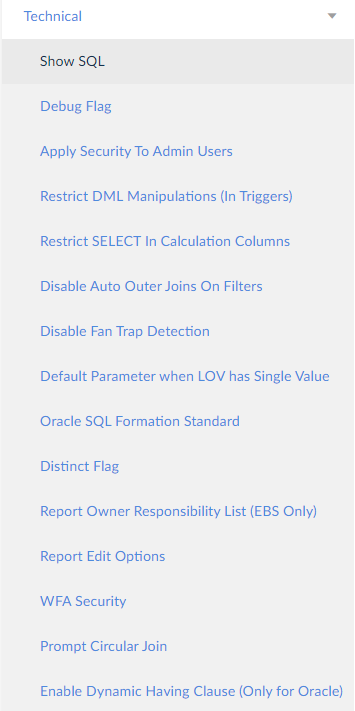
- Show SQL: Turning this setting to ON will show View SQL on the report submission screen. It is shown in all the areas where Show SQL is present like in Domain SQL Table Creation, SQL Report Creation, LOV creation with SQL Query and Report Parameter SQL Query.
- Debug Flag: Enabling this setting for Users and User Groups will begin to capture log files to resolve critical issues. Log files can quickly take up space; therefore it must be managed and monitored.
- Apply Security to Admin Users: When set to Yes, the administrator user will see only owned and shared reports/domains/charts/dashboards for the logged in user. If set to No, the administrator user can see all the available reports/domains/charts/dashboards irrespective of the ownership.
- Restrict DML Manipulations (in Triggers): When set to ON, the user is will not be able to use DML operations in Trigger Text.
- Restrict SELECT in Calculations Columns: When set to ON, the user is will not be able to use select statements in calculation column formulas.
- Disable Auto Outer Joins on Filters: When set to Yes, outer joins on filters will be disabled.
- Disable Fan Trap Detection: When set to Yes, fan trap detection will be disabled.
- Default Parameter when LOV has single Value: When set to Yes, and the parameter value count equals 1 then by default highlight the parameter on submit page.
- Oracle SQL Formation Standard: From the list, select the method by which SQL queries will be generated (SQL 92 or Oracle (SQL 89) Standard).
- Distinct Flag: When set to ON, the distinct flag will be set to true in report creation.
- Report Owner Responsibility List (EBS Only): Select the user access to responsibilities.
- Report Edit Options: Control the visibility of Triggers, Template and Portals options to the users. Checking will make them visible.
- WFA Security:You are provided with additional WFA security functionality at Dashboards, Domain, Reports and Admin level. Depending on the security options selected, the rights of the WFA user will be exported to the SplashBI user. You need to have charts, and reports created in the WFA related domain only to view this option. Using Default as the option at the Report and Chart level will use the option selected at this level.
- Prompt Circular Join: Enabling this option will prompt the user about the circular join presence.
- Enable Dynamic Having Clause (Only for Oracle): Enabling this option will display the having dynamic clause for that user.
- Show Filter Values in Output Formats : Ability to view the filters and its values used for report submission in HTML, PDF, WEBPIVOT, EXCEL and XML outputs based on this setting .
- Past Submissions Time Format: Set this to AM/PM value to view the submissions time in AM/PM formats.
- Disable Bind Parameters:Set this to disable bind parameters concept for debugging report and dashboard executions.
- Enable Filter Values In Report Header Text : Set this to use filters in report header text and show the replaced values in header of EXCEL output format.
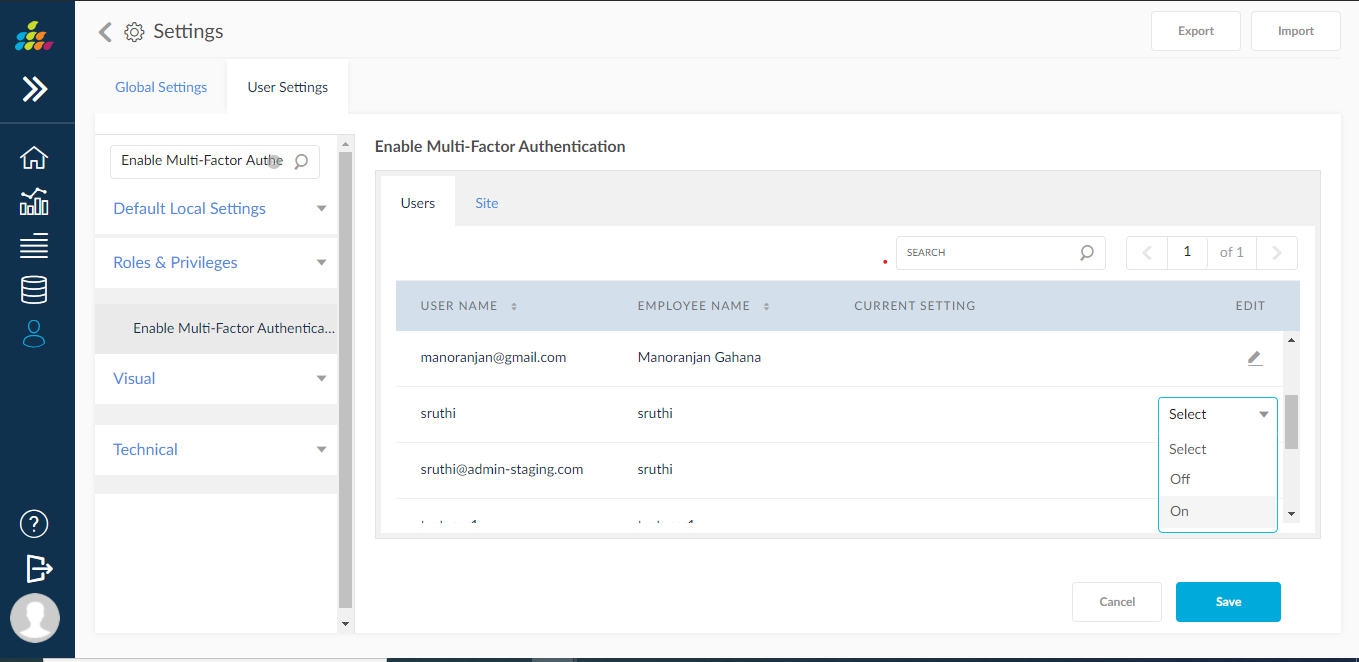
- Enable Multi-Factor Authentication:This setting is used to enable Multi-Factor authentication while login, if we set value to “On” after entering proper user name and password, it will navigate to OTP screen, when user entered proper OTP, user will able to access the application.
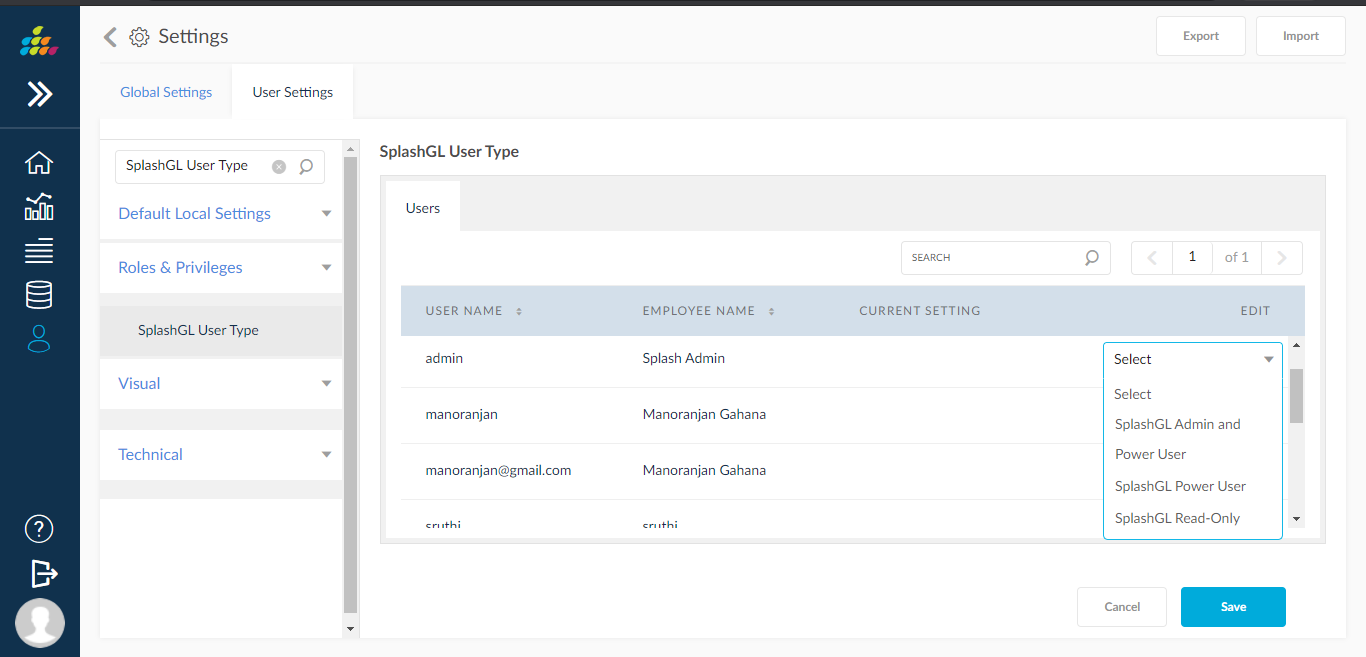
- SplashGL User Type:This setting is used to define SplashGL user roles, based on role accessibility is restricted in SplashGL.User roles like SplashGL admin and power user, SplashGL Power User, SplashGL Read-Only.
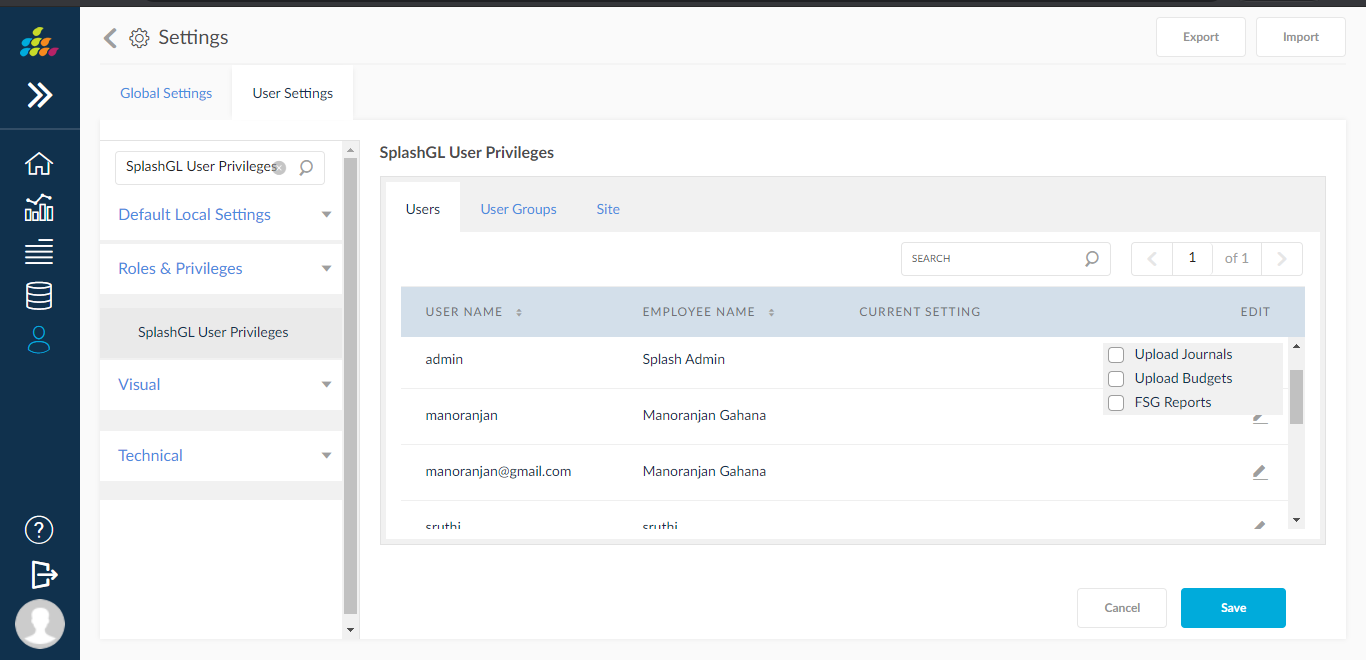
- SplashGL User Privileges:This setting is used to give privileges to SplashGL users.
- SplashGL User Refresh Options: This setting is used to provide SplashGL user refresh options are “Cube Only”, “Real-Time only” and “Both”, based on selected value it will effect in SplashGL.

- Enable Process Log: This setting is used to Enable Process Log based on selection.
- Generate Template Outputs during Report Submission:If we set this setting value to “yes”, then selected template outputs will be generated as part of report submission process.
- Exclude Number Format for Template based XML: This setting is used to exclude number format in template based XML output
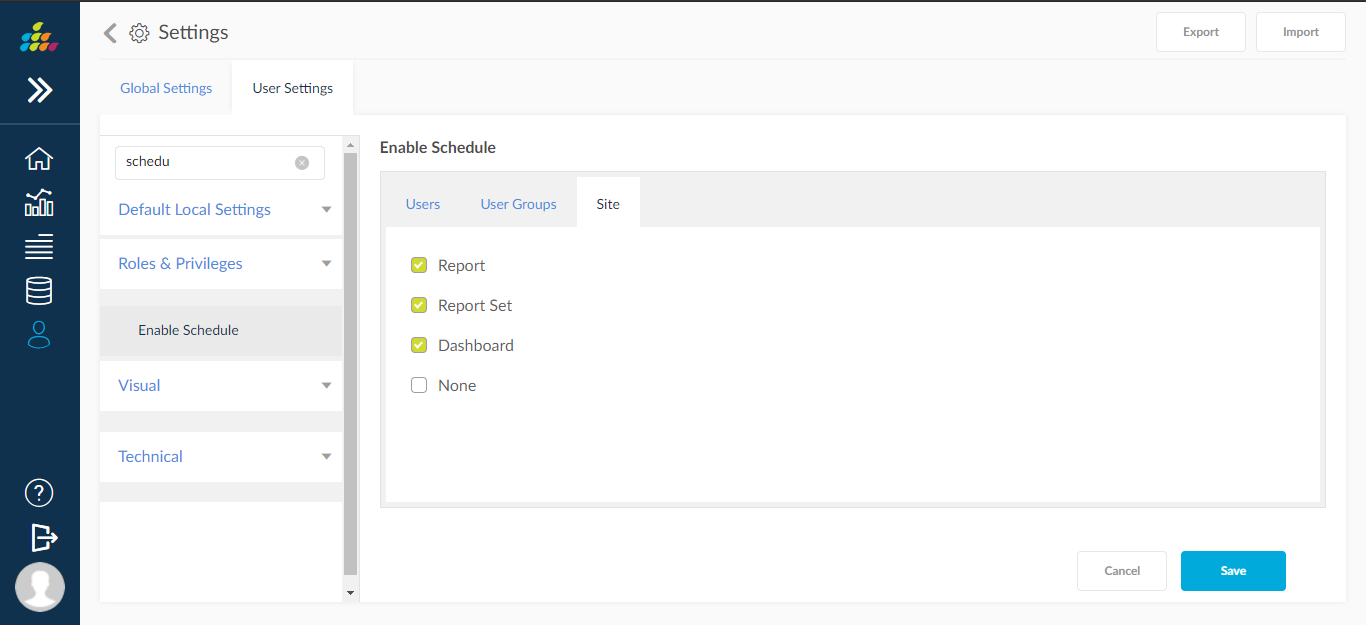
- Enable Schedule: This setting is used to control a user's ability to schedule .In some cases they would like to prevent some users from scheduling a report even though they have access to run the report.
NOTE: Most of these settings can also be applied to the user at the user creation level.