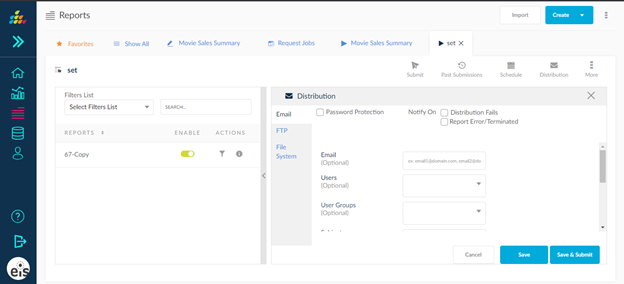
Report Distribution
Distribute report outputs to other users from the Report Distribution screen. To enter the Distribution screen, click the ![]() icon.
icon.
Navigation: Reports -> Create/Edit -> Distribution.
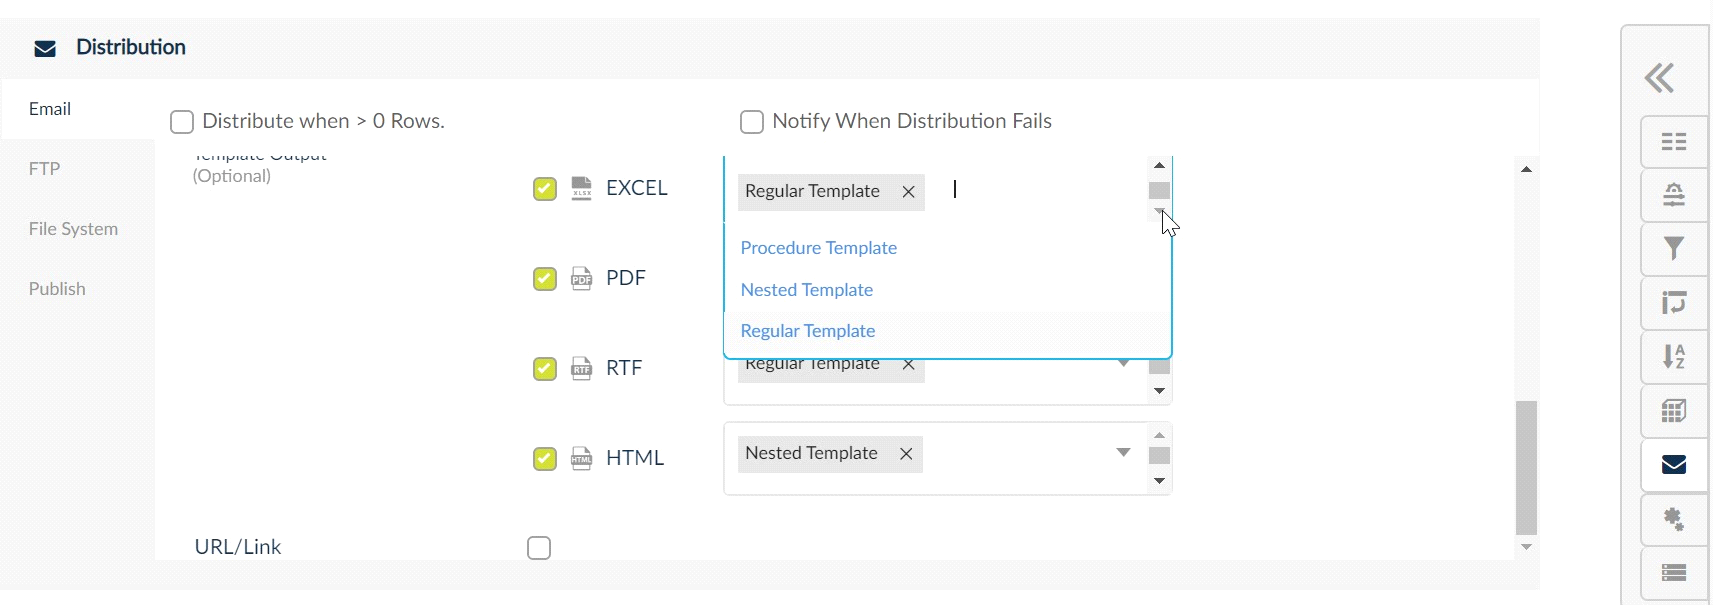
As displayed in the image below, the two check boxes allow the user to
- Distribute only when report fetches greater than zero rows: Check this box to stop distribution of a report when the report has zero rows in the output.
- Send email notification when distribution fails: You will be notified of a failure in the distribution process through a mail.
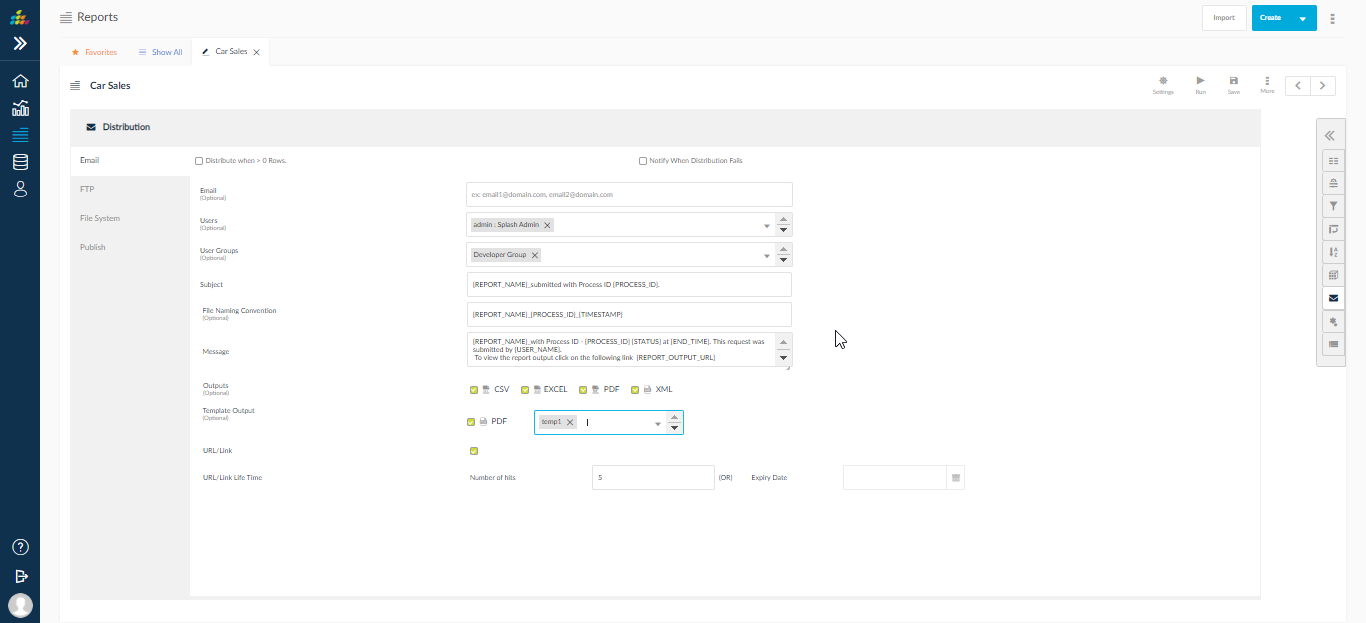
Email Tab
Distribute the reports through emails to users, user groups inside and outside the organization.
- Enter the Email IDs of the users in the Email field, to send to specific email addresses.
- Select user name in the Users field to send report outputs to specific SplashBI users. When the user name is chosen, the email addresses defined at their SplashBI user level will be used to send out a email.
- Choose User groups in the User groups filed, to send the report output to a pre-defined user group. User groups can be defined on the Reports Home page using User Group icon.
- The Subject and the Message will be auto filled. You can change them according to your need.
- Select the output options that the user can download the distributed report.
- Check the URL/Link to open the distributed report in a web browser. The user has options to set the limit for viewing the URL through setting Number of hits or by setting an Expiry Date.
- Click Save & Submit to save and navigate to the submit screen to submit the report.
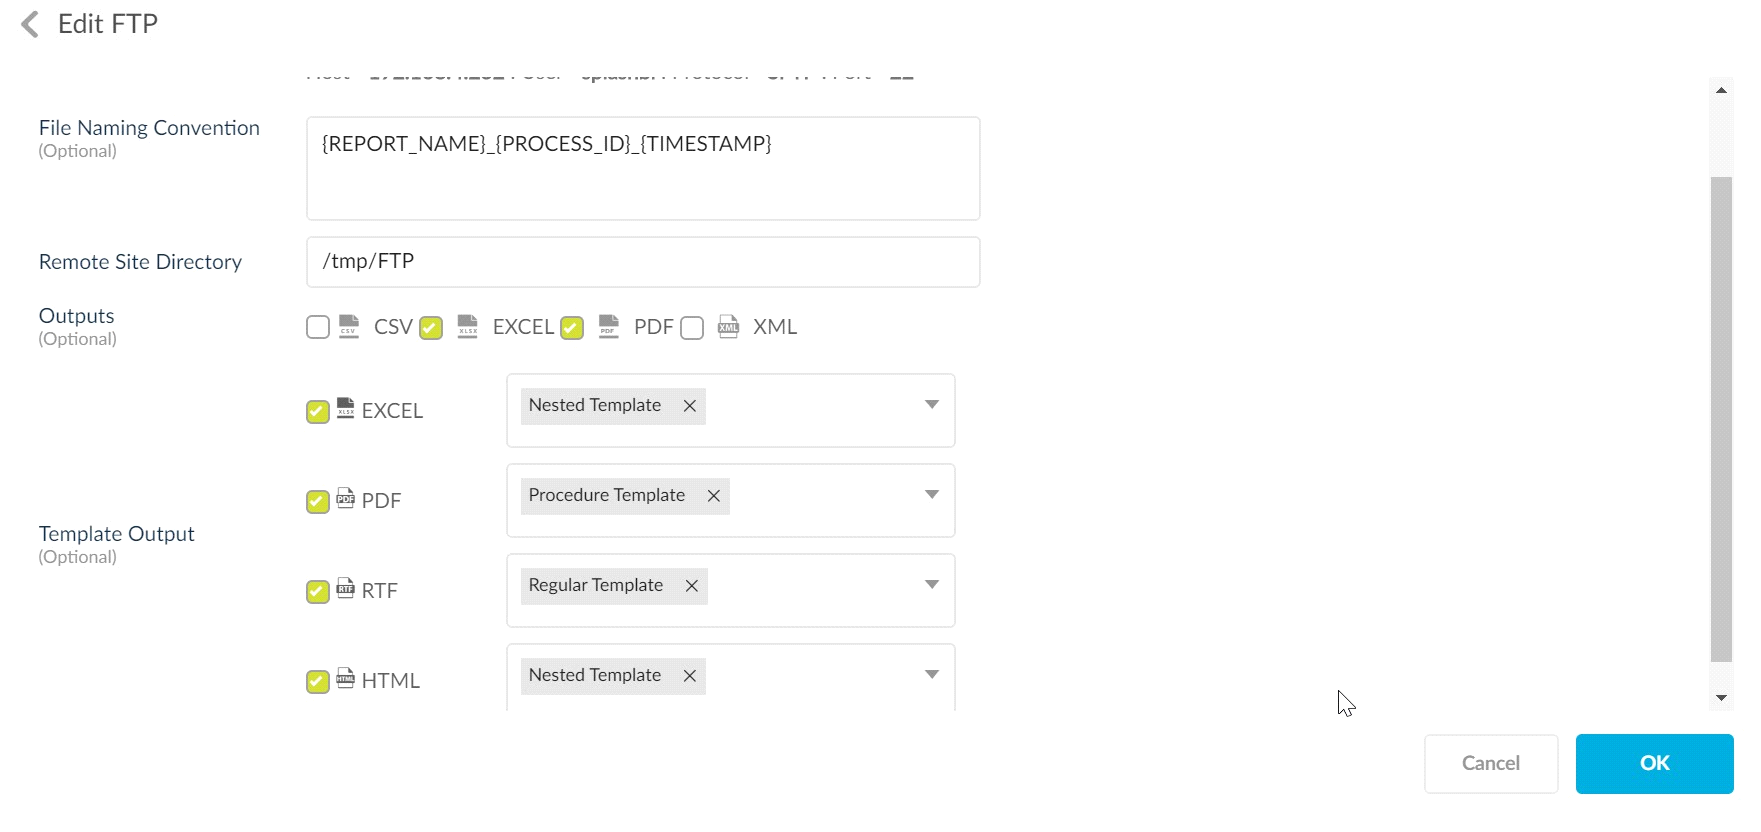
FTP Panel
Choose to distribute the report output to an FTP location using the FTP tab. File Transfer Protocol is used to upload different output type files to the server system by using the connection of that particular server.
To create a FTP:
- Click the FTP tab. Click the
 icon to display the Create Distribution pop-up.
 - Click the
 icon to create the FTP Site connection.
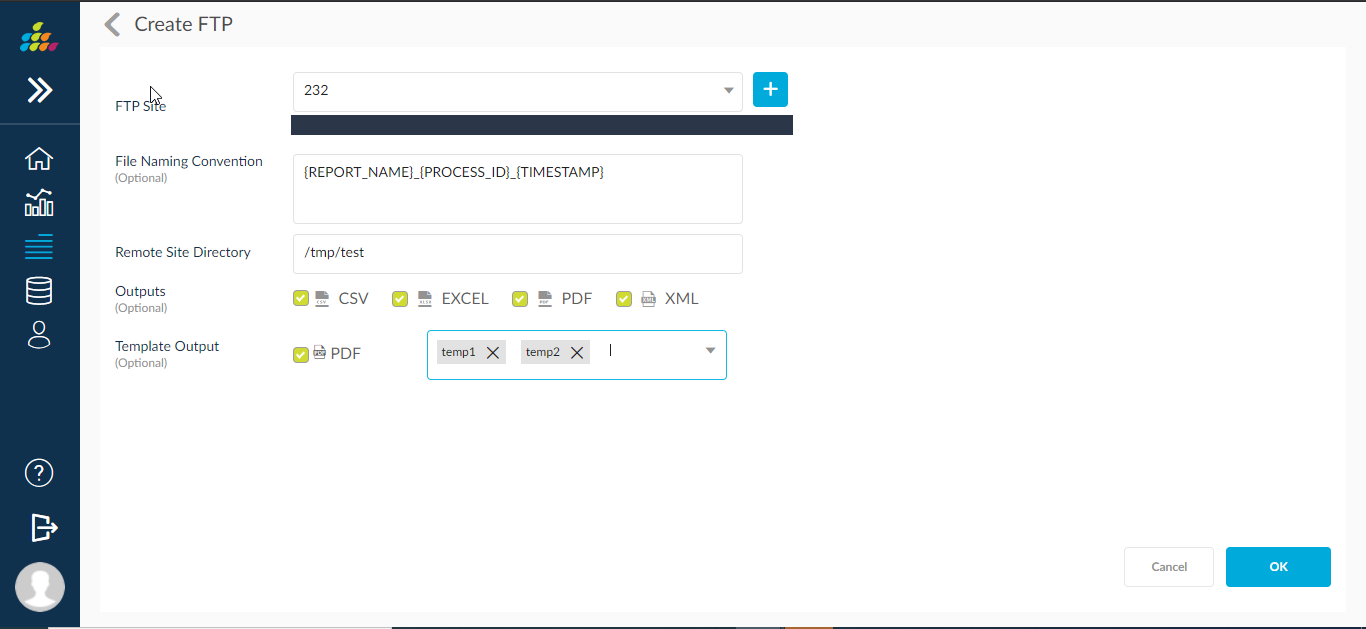
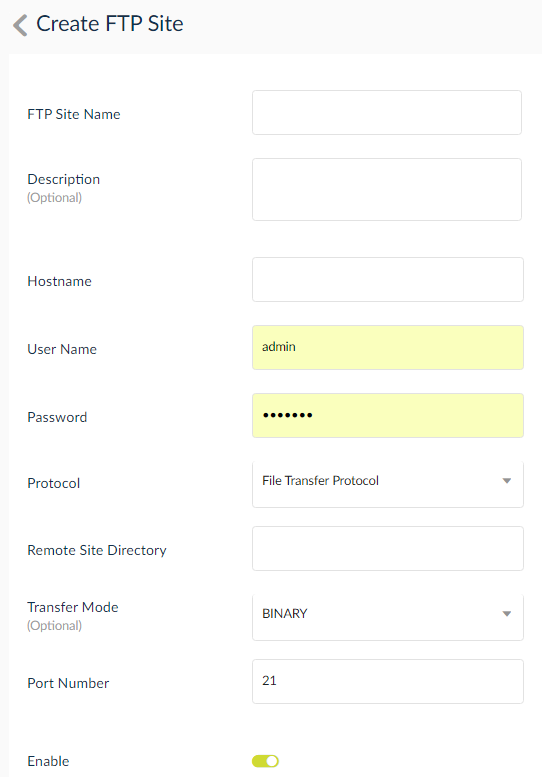
3. Enter the FTP Site Name.
4. Enter the Host Name.
5. The User Name and Password will be pre-filled.
6. In the Protocol drop down select from either File Transfer Protocol or SSH File Transfer Protocol ( Secure File Transfer Protocol)
7. In the Remote Site Directory enter the URL of the site.
8. Select the Transfer Mode from Binary or ASCII options.
9. The Port Number is pre-filled.
10. Click OK.
11. Created FTP distribution is displayed in the FTP tab. (As shown in the above image).
12. The File Naming Convention is auto filled.
13. Select the Output type and click OK.

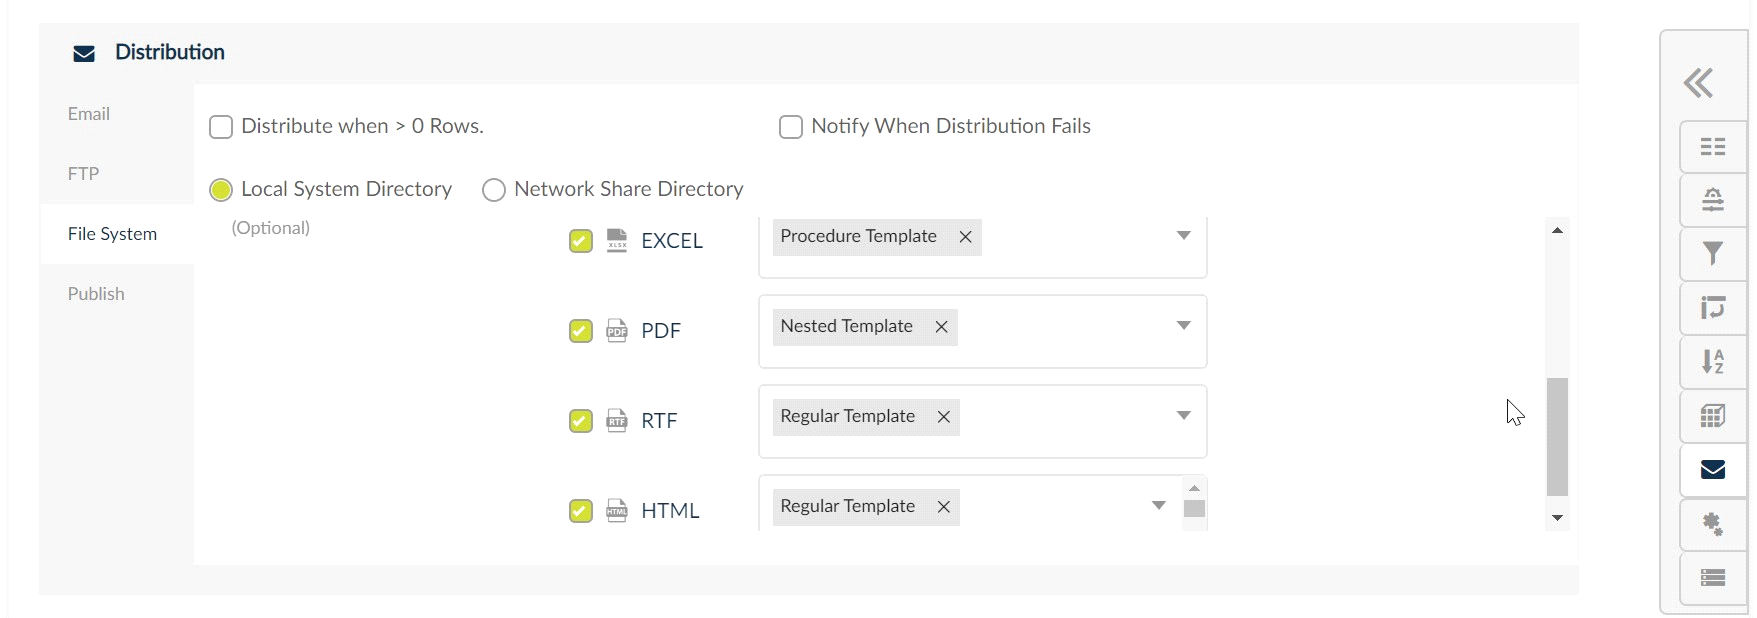
File System
File System is used to upload the report output files to local Host by using the file system path of that particular local host.

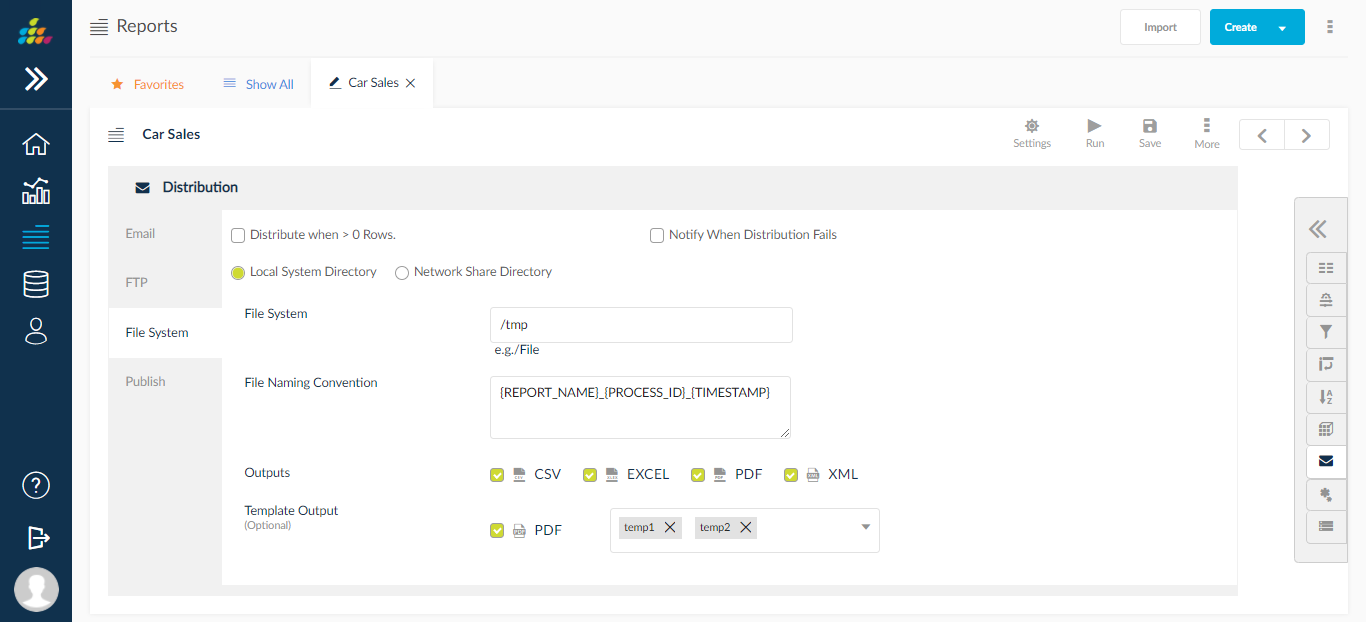
There are two types of directories to upload files.
Local System and Network Share. Local system will take files from the local system while Network Share takes file from a network.
To create a new file system:
- Click the plus icon.
- Click the plus icon to create a new network drive. Enter the mandatory details and click OK.
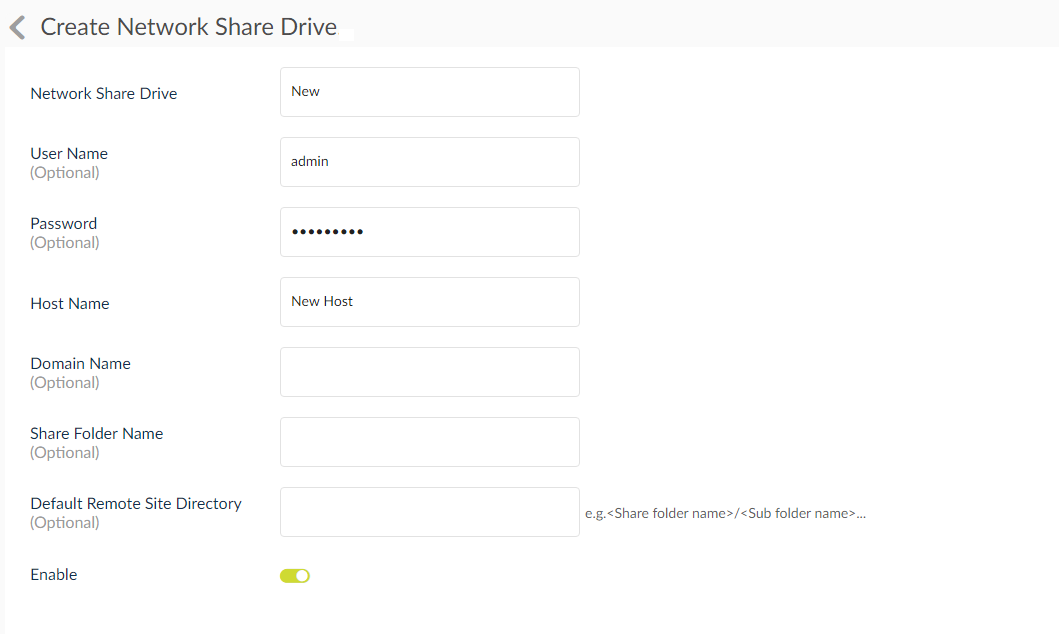
3. Enter the remote directory URL/Link and click OK.
4. The created file system will be displayed.
Distributing the Report Process
- Once you run the report you wanted. The result of the report is generated. Click on Distribution at the top right corner.
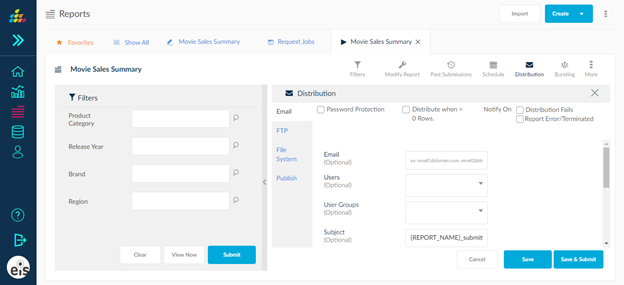
- Enter the Email ID, the file name convention and the message are pre-loaded, you can change them to your need.
- Check the outputs. Checking the URL will create a provision for a URL link in the message. Once the intended user receives the message, the URL will redirect them to the report output.
- Click Save to save the data. Then you click Submit to run the report for outputs. Else, click Save & Submit to save the input data and run the report.
- You can distribute the report through Email, File Transfer Protocol (FTP) or File System. Know more about them in the topic Distribution Configuration.
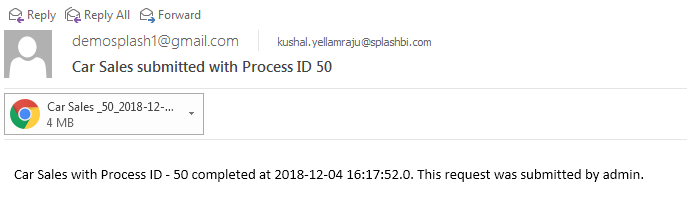
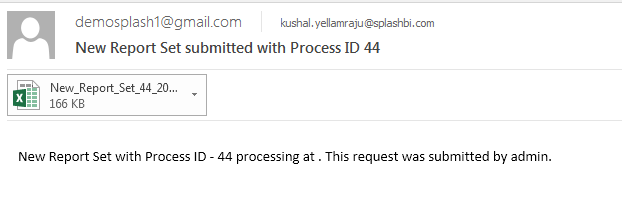
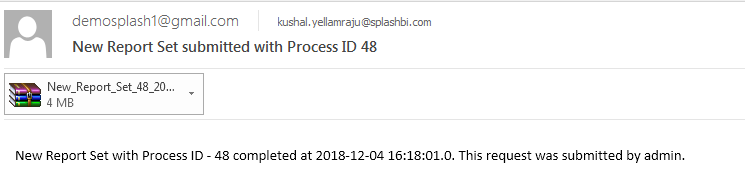
- You will be notified with the following message.

The intended user is delivered the email with PDF as the output format.
NOTE:
- The distribution options you have created during the report creation will be visible here. You can also create distribution options from here. Save the settings and values again to initiate the distribution process.
- Clicking Save & Submit will directly run the report and produce the outputs. If you have checked URL and unchecked the options CSV, EXCEL and PDF, then the outputs
 icon will not be visible.
Auxiliary Options
- Distribute only when report fetches greater than zero rows: Checking this option will not send the reports that have zero rows.
- Send email notification when distribution fails: Sends the sender of the email and error notification regarding the failure in sending the report with the reason for failure. Checking this option will activate a text box where you need to type the email address.

- Password Protect: Enable this option to encrypt your report details with a password so that only intended users can access the report. Enabling the Password Protection will ask you for a passcode. Enter the password in the text box as displayed.

Distribution for Report Sets
The process is the same as Reports but you will have additional option to send the report as a single set. When you enable this option, the other output options will be disabled. Click Save and Submit to send the report set.
NOTE: When the report set output is sent as a single set, it will be sent to the email as an Excel file.
In case you choose more than one output option, then the mail would be received with a zipped file as an attachment.
Redistribution of Reports
A report can be redistributed from the past submissions window and also from the generated reports window.
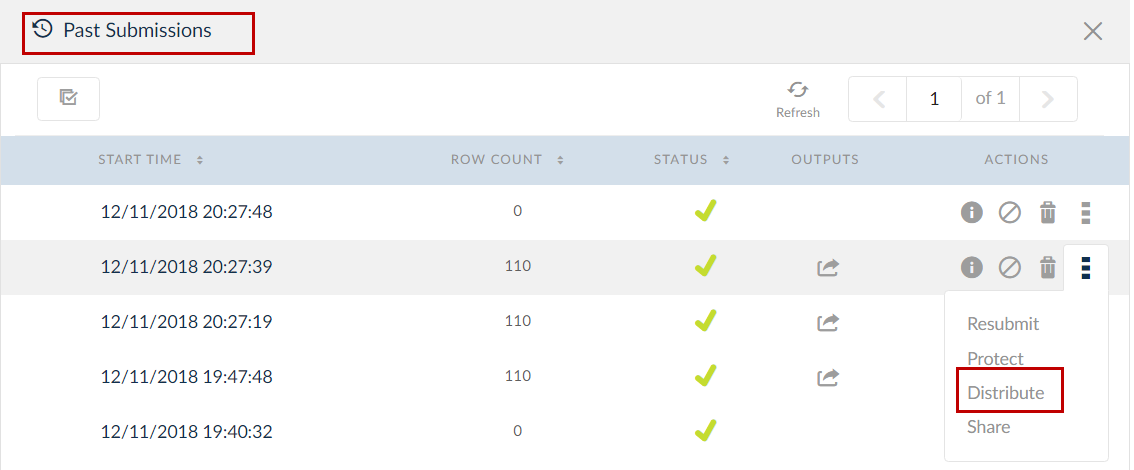
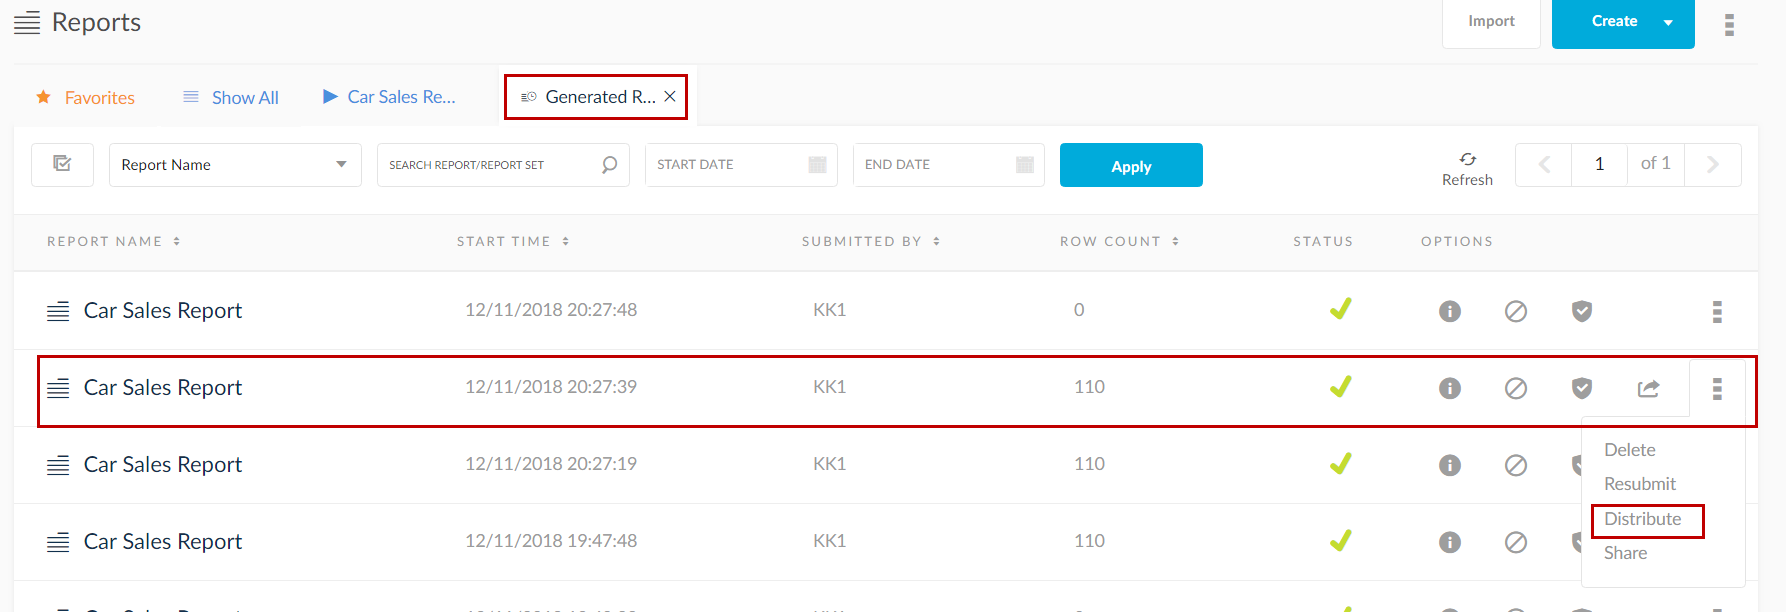
- Clicking Distribute through here will open the same window with Email, FTP and File System as the distribution channels. The values given previously will be pre-populated.
- One thing to note here is only Send option is visible as opposed to Save & Submit option present in Distribution. This option is present since you will be distributing a report that has been already submitted.

Publish
Process share is an option is renamed to Publish and moved into Process Distribute screen. A report can be published by Users, User Groups, Roles/Responsibilities and Role groups.
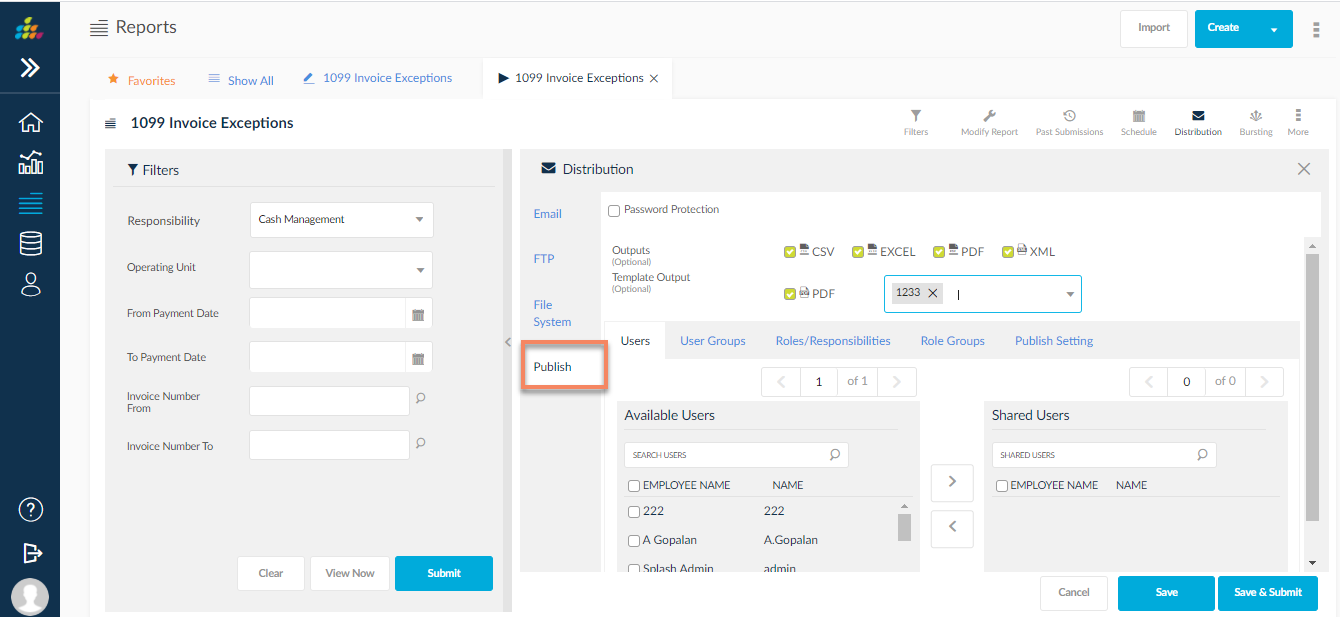
- You can move the user for publishing by using the arrow icons from Available Users to Shared Users. These functions are extended to user groups and roles/responsibilities and role groups.
- You can select the publish reports output type from the options CSV, EXCEL, and PDF.
- You can add a password to the publish when viewed from the process distribution icon.
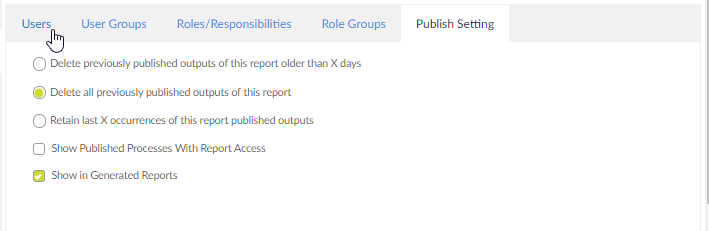
Publish Settings
Control the visibility of the published reports using the options:
- Delete previously published outputs of this report older than X days
- Delete all previously published outputs of this report
- Retain last X occurrences of this report published outputs
Here X is a number database that can be set. Clicking the 1st and 3rd options will display a text box to enter the number.
Show Published Processes With Report Access: Check this box so that only users with access to the published report can view the report. If this box is unchecked, users need not have access to the published reports to view the reports.
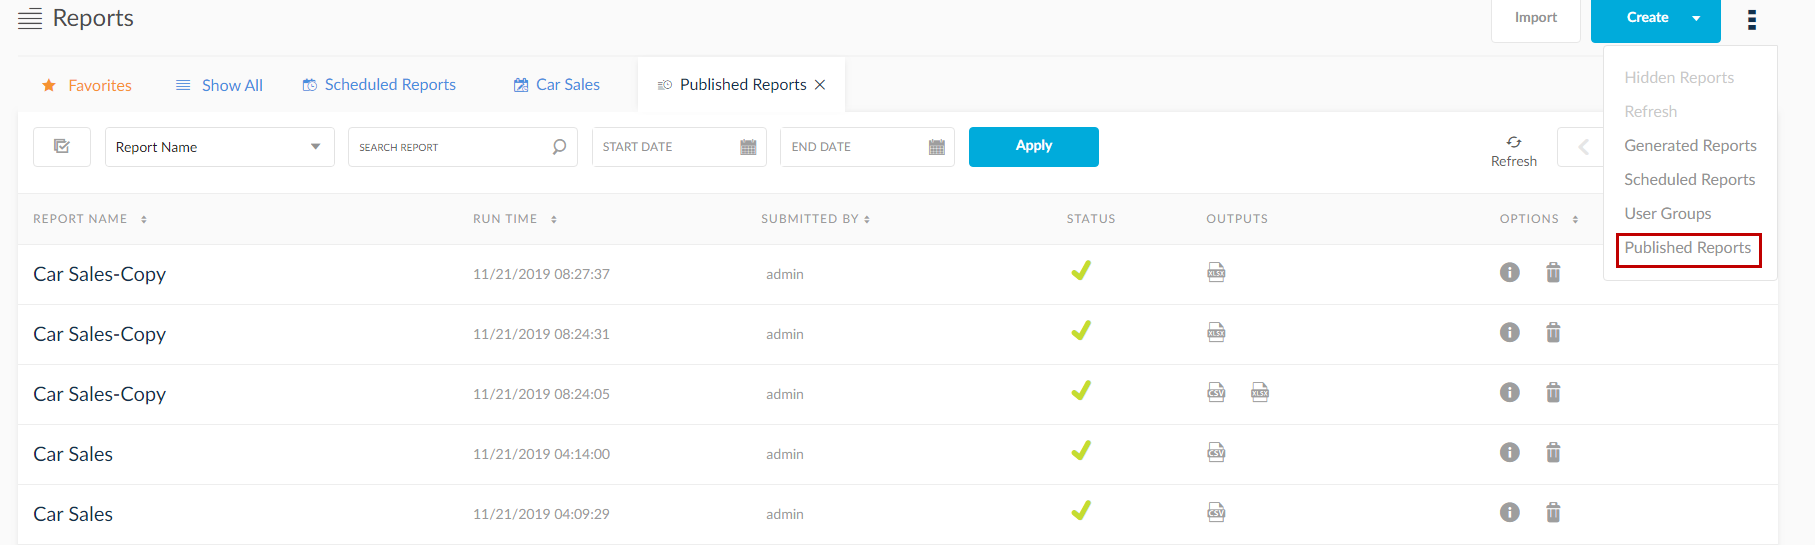
Show in Generated Reports: Published reports are visible for a user in the Reports → More icon → Published Reports link. However, checking this option will display the published reports in the Generated Reports list too if the user wants all processes in Generated Reports list.
NOTE: The Roles/Responsibilities tab will not be visible when the report is not based on Oracle EBS/Cloud.
Ability To Distribute BIP Templates
User can distribute BIPublisher type templates using all distribution methods (Email, FTP, File System and Publish). While template creation which outputs were selected, based on that outputs selection template names are displayed in Distribution page on their respective template output dropdowns. User can able to select multiple templates for any template output from the respective drop down.
Template outputs in FTP Distribution:
Template outputs in File System Distribution:
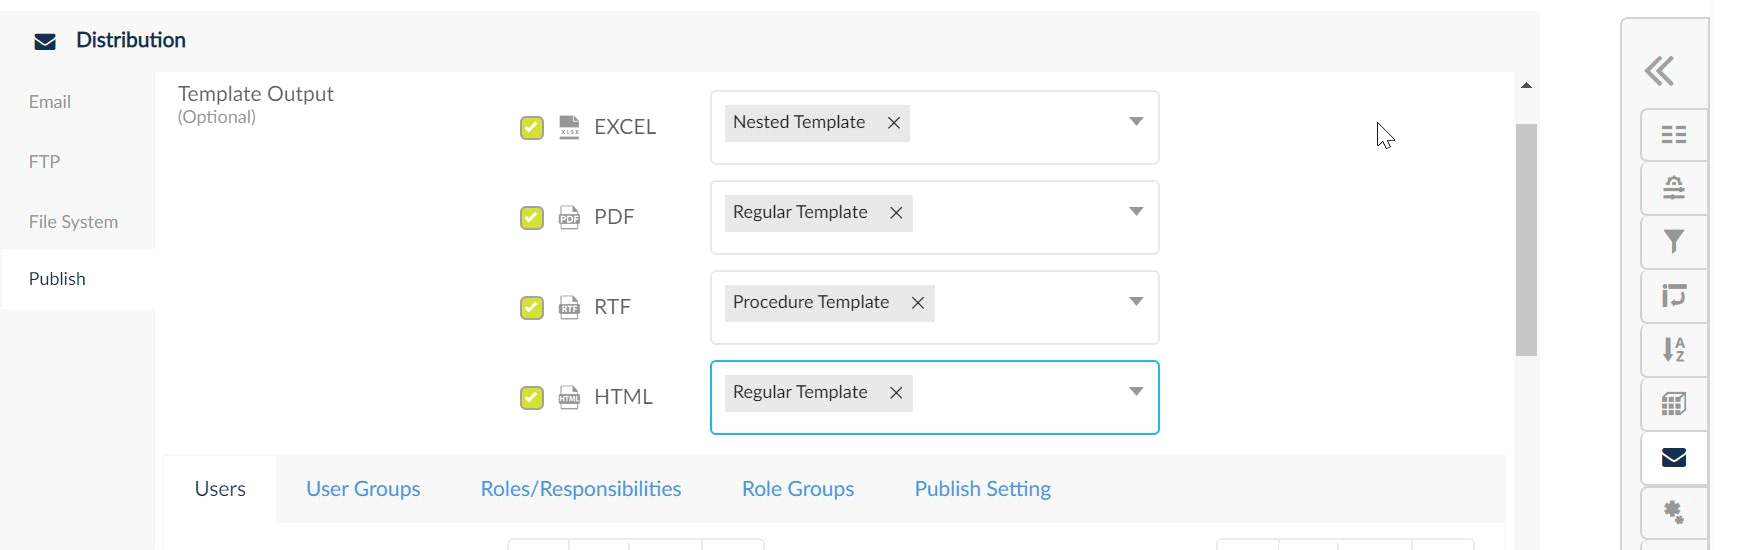
Template Outputs in Distribution – Publish: